SAV Debug Console
SAV Debug Console is a set of flexible and light weight prefabs that create a runtime debug console display that you can add to almost any Unity application. Capture runtime Debug.Log type messages and Logcat output.
Unity version 2021.3.29f1 or later is required to use SAV Debug Console
|
We would welcome the donation of development headsets for other platforms so that I can offer a real-time head tracking debug console on every platform. Please e-mail us. |
|
SAV Debug Console QuickStart:
* Some links may be out of date. Meta Quest features, recommended practices and documentation change frequently.
For Controllers only:
* If using "Track On Start", position the debug window relative to the TrackingSpace CenterEyeAnchor (not the scene's position) * Turn off Tracking if you are having trouble seeing the startup location. Build and run
System Keyboard
In OVRManager script->General->Virtual Keyboard Support
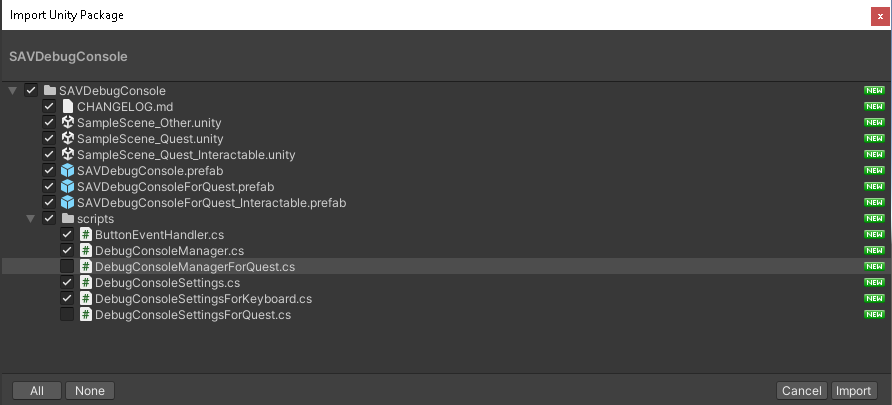
1. During the asset import process, uncheck DebugConsoleManagerForQuest and DebugConsoleSettingsForQuest and DebugConsoleManagerForQuestInteractable
2. Search for and drag the SAVDebugConsole_Other prefab into the hierarchy 3a. Drag a camera into SAVDebugConsole > DebugConsoleManager > DebugConsoleCanvas > Canvas Component > Event Camera Or 3b. Change the Canvas Component to your needs 4. For keyboard control, assign the Keycodes to the SAVDebugConsole keyboard actions. 5. Position the SAVDebugConsole game object in view of the Camera 6. Play and/or Build and run 7. Reference: Sample scene Packages\SAVDebugConsole\Scenes\SampleScene_Other.
SAV Debug Console Settings:
Show Detail - When selected log message details will be displayed.
Track On Start - Default Off. When selected the console will track the Headset/Camera at startup
Size Big Small - Keycode to grow/shrink height
Locate the DebugConsoleManager in the hierarchy or active scene
Click the magnifying glass icon
SAV Debug Console additional help:
Note that there is a transition time on application start where the console is not registered to receive Debug.Log messages. If this is a problem, you will need to delay startup of other assets until the SAV Debug Console is registered.
Optional Settings:
DebugConsoleManager:
Max Console Entries - Max number of SAV Debug Console entry history to keep.
* The recommended way to change the size is the Transform Scale for SAVDebugConsoleForQuest_Interactable / SAVDebugConsoleForQuest / SAVDebugConsole_Other.
Width: Set the SAVDebugConsole width
Search for the ConsoleLogMessage prefab (Packages\SAVDebugConsole\Prefabs\ConsoleLogMessage)
And/Or Search for the ConsoleLogStack prefab (Packages\SAVDebugConsole\Prefabs\ConsoleLogStack)
Text > Font: Set SAV Debug Console default message text font
Both Keyboards show up
See https://developer.oculus.com/documentation/unity/VK-unity-overview/
**On the Oculus menu, go to Tools > Update AndroidManifest.xml
Set visibility of [BuildingBlock] Virtual Keyboard to false in hierarchy Uncheck CameraRig->General->Requires System Keyboard Set OVRVirtualKeyboard to None in SAVInputField->InputFieldWithStringFormat_Quest->OVR Virtual Keyboard. No keyboards show up
Use a short trigger pull on the InputField
See https://developer.oculus.com/documentation/unity/VK-unity-overview/ **On the Oculus menu, go to Tools > Update AndroidManifest.xml Set visibility of [BuildingBlock] Virtual Keyboard to true in hierarchy. Drag a virtual keyboard into SAVInputField->InputFieldWithStringFormat_Quest->OVR Virtual Keyboard OR Check CameraRig->General->Requires System Keyboard RayInteractor length:
If you dont see the RayInteractor on SAV Debug Console, one setting to check is the Max Ray Length of the RayInteractor.
Default is 5. To change it:
1. In the hierarchy search bar enter: t:RayInteractor
2a. Choose the Hand/Controller RayInteractor and update the Max Ray Length property. And/Or 2b. Move the Transform Position Z closer to the CameraRig for the SAVDebugConsoleForQuest_Interactable / SAVDebugConsoleForQuest / SAVDebugConsole_Other gameobjects.
|